
Purpose: pen and pencil stand is a nice useful gift for both children and adults. Crafts are within the power of children 6-7-8 years old, but its manufacture requires accuracy and patience. In addition, cutting out parts of the stand contributes to the development of fine motor skills in children, which is especially important at this age. Another plus of this craft is that the materials for its manufacture are available to everyone.
Target: development of children's creativity.
Tasks:
To cultivate the desire to do crafts with their own hands, to develop fine motor skills;
To form an artistic taste, to cultivate perseverance, accuracy, patience.
To make a stand with our own hands, we need: a box (any), but I took from under tea (you can have several), wrapping paper (it can also be colored paper, a piece of wallpaper, etc.), ribbon, glue, jewelry, scissors.

We take a box of tea. This is our stand base.

Cut off the lid from the box. And we will use it as an additional compartment for the stand.

We take measurements of our box, transfer them to wrapping paper, cut them to size.

We glue both of our blanks with wrapping paper.

We glue our lid to the main box below. We get two compartments of the stand.

We decorate a small compartment (“pocket”, department) with a butterfly (you can decorate with anything).

This is how we got the pencil holder.

The edges of our coaster were left unfinished, so we take the finishing tape and glue it around the edge. (You can also cut out a curly strip of paper).

Now we fill the stand with pens, pencils, scissors, etc. Everything is ready. It turned out to be a spacious stand. And it does not take up much space, my stand is 10cm * 9.5cm * 6cm.


Good luck in production.
The stationery holder is a simple but very important accessory. Thanks to her, there will be order on the desktop, and you can easily find the right tool. Making it with your own hands is quite easy. Here are just some of the options.
To maintain order on your home desktop, you can make coasters for pencils, pens, scissors and other office supplies.

A pencil holder will allow you to always keep writing objects at hand, and not look for them in the corners of the bottomless desk drawers.
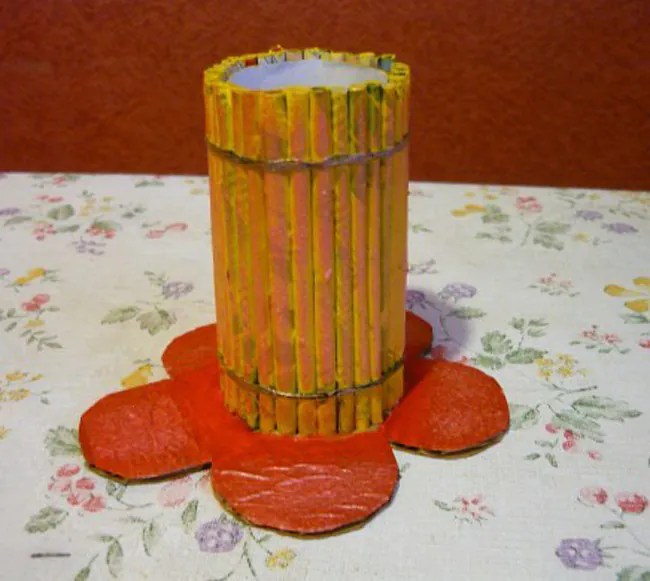
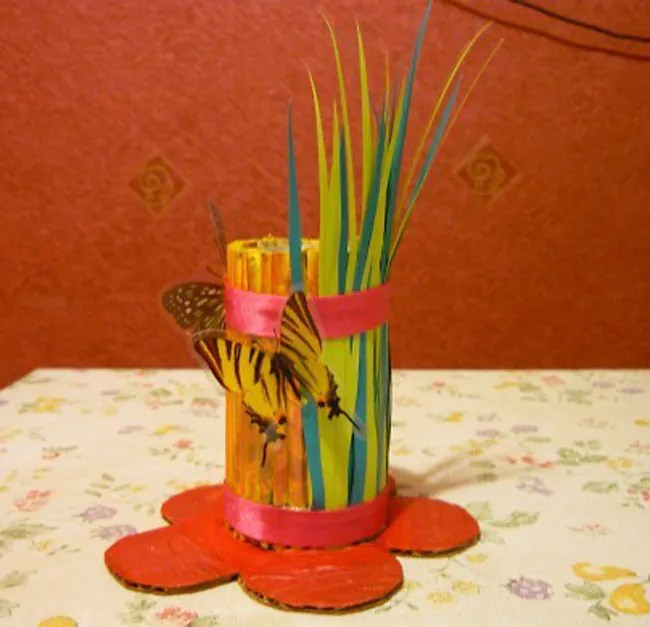
Do-it-yourself stand for pencils and pens from newspaper tubes
This technology appeared relatively recently, but has already gained popularity. Necessary tools and materials:
- newspapers;
- glue;
- scissors;
- cardboard;
- varnish or paint (optional).

There are different ways to work with newspaper tubes.
The first, the most elementary, is as follows: a sheet of a newspaper or magazine is wound diagonally onto a knitting needle. The edge is smeared with glue and pressed to fix. If such tubes are made from sheets of a glossy magazine, then you can not paint them later - you get a fun color.

You can involve children in the manufacture of a pencil box, who will bring something new and interesting to its design.
Then the resulting “semi-finished product” is glued onto the base (cardboard glass, juice box) and, if desired, covered with paint or varnish.
A more interesting option, thanks to which sculptures are created from newspaper tubes, is weaving.

The process is very similar to wicker weaving.
The base of the pencil holder can be made of cardboard, or you can weave it like the bottom of a basket. Of course, it will take time to make an interesting model. A simple glass can be done even by a beginner.
The finished stand is coated with PVC glue. And then, if desired, paint.
The technology is very economical.

Allows you to get rid of deposits of old newspapers and create an interesting thing with your own hands.
paper pencil
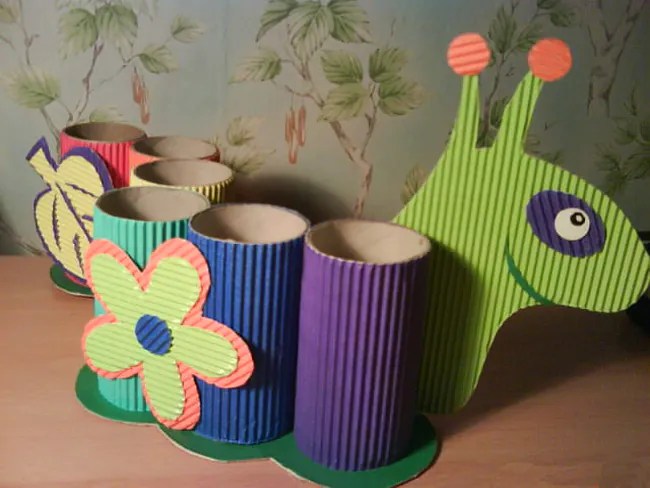
As a basis, bushings from paper towels or toilet paper are used. Having measured the diameter of the sleeve and its height, we cut colored paper for decoration.

We decorate the bushings with paper.
Then we glue the parts in random order and attach them to the base. For the base, it is better to take a sheet of thick cardboard.

If desired, the pencil holder is decorated with multi-colored paper flowers.
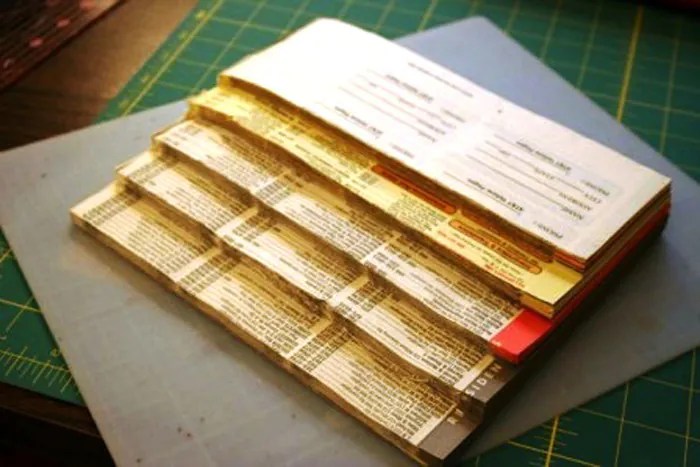
Stand for pencils and pens from the telephone directory
Would need:
- directory;
- sharp scissors;
- glue;
- paints;
- paper towel roll.
The reference book needs to be cut, wrap the sleeve with pages and fix the form with a paper holder.

We divide the flexible directory into five identical parts.
Do this for all pages. Then glue to keep the shape.
Make a bottom (from cardboard or plastic) in the shape of the resulting flower and glue it. If desired, the stand can be painted.

If the directory is cut into fragments of different heights, a very spectacular little thing is obtained.
DIY gold pencil holder
To create such a masterpiece you will need:
- metal jars or cases of various sizes (plastic containers or pipe cuts are also suitable);
- glue;
- base (board or metal plate).
- golden paint.

Although we are not talking about real gold, this model looks very stylish.
The containers are placed on the basis in random order, glued, and then the whole structure is covered with "golden" paint.

It will decorate any desktop and contain all the necessary tools.
Can holder for pencils and pens
It turns out that a very original thing can be built from a tin can, a piece of cloth and glue. The technology is simple.

If desired, add different decorative elements.
To begin with, we take measurements from the bank. We are interested in circumference and height.
Then we sew a fabric cover. We decorate it with braid.
We place the jar inside the cover, and fill the edges of the fabric inside and fix it with glue.
And here is what we get as a result.

As they say: simple and tasteful.
Do-it-yourself tumbler stand for pencils
A tumbler pencil is made from a drink can. To do this, using sandpaper, paint is removed from the can. Then lead is melted (about 80 g) and poured into the bottom of the jar from the outside. When the metal hardens, it is carefully removed and glued to the bottom with the convex side out. The jar is then coated with paint and used for pencils.

Lead "stand" will not allow the pencil case to fall.
Stand for pencils and pens made of thread
Do-it-yourself pen stand from a can, threads, decorative elements and fantasy. An ordinary jar is covered with a layer of glue and wrapped with threads (either one color or multi-colored).

If you want something unusual, you can use different accessories purchased at a needlework store.
Then the product is decorated with buttons. This is the most budget option, as there are extra buttons in every home.
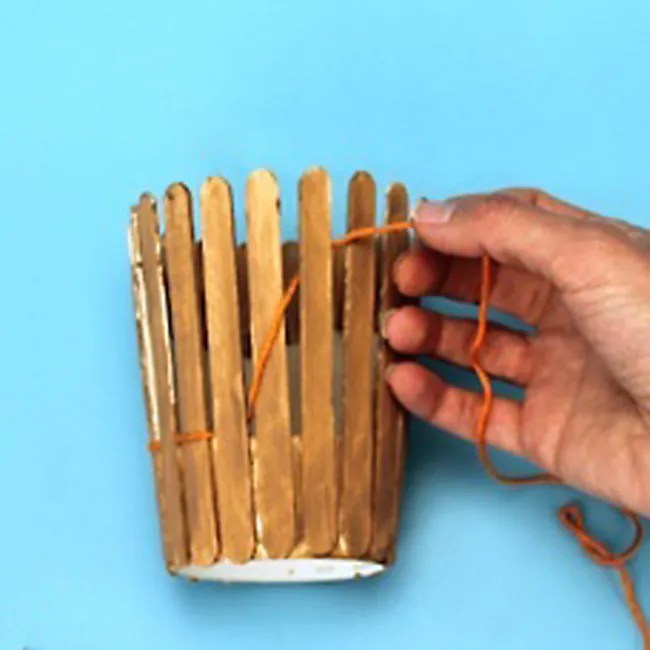
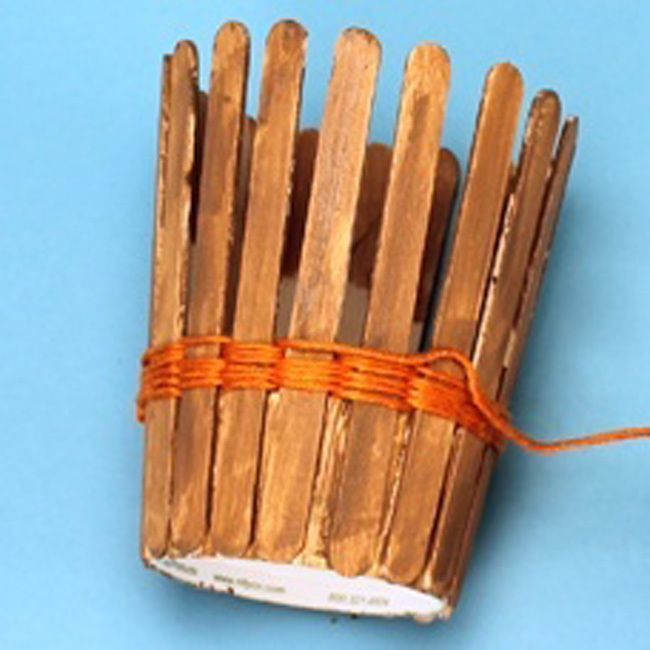
Another option. To work, you will need multi-colored threads, it is better if they are not very thin. As well as ice cream sticks and a cardboard or plastic glass.

When the last row is completed, fix the tip of the thread with glue.
We cut the glass so that the height from the bottom is 3 - 5 cm. Then we glue sticks to it around the entire circumference, and pass multi-colored threads around the sticks.

Thanks to the bright colors of the threads, the pencil case turns out to be very “cheerful”.
Cork wood discs
Several wooden discs are glued together, holes are drilled in them. Perhaps the creation of this model will require minimal effort. And it looks very stylish.

If desired, the stand can be made from several pieces of thick plywood.
Hi-tech stand
Old floppy disks (5 pieces) are interconnected using plastic fasteners in the form of a cube.

Unusual design solution.
Cardboard tube
Bushes from paper towels and toilet paper are wrapped in paper of different colors or painted, and placed inside the box in random order.

For greater stability, the bottom of the box is coated with glue.
Burlap case
The technology is similar to creating a thread stand. Only the jar is decorated with a strip of burlap and decorative braid.

Glue a piece of burlap on a tin can, glue flowers formed from light linen fabric around the perimeter of the neck.
Bar stand
It is easy to make a stand for pens from a wooden block: you need to drill holes of the right size and in the right quantity in the workpiece.

We saw off a small part from a dry tree with a saw, then with a drill in the upper part of the stump we create many holes, into which we install pencils.
Pencil from sewer pipes
The remains of pipes of different diameters are cut obliquely to the desired size. Do this with a sharp knife so that there are no notches left. If necessary, the sections can be carefully processed with fine sandpaper.

We cut sewer pipes of different diameters into small segments with a jigsaw or hand saw.
The parts are glued together and the bottom is glued.
The finished stand can be painted with paint or coated with a transparent gloss varnish.

We paste each of the segments in a row on a short thin board.
The most ordinary workplace can be made unique with the help of a DIY stationery stand. It will be not only creative, but also a very convenient little thing.
VIDEO: Do-it-yourself stand for pencils and pens.
50 photos of unusual pencil holders:


Pencils, that is, coasters, or simply cups for pencils and felt-tip pens, for creative people, of course, should be unusual, creative, stylized for something.
In this section, we are ready to offer you a lot of examples of such wonderful crafts. Salt dough or gypsum can serve as a material for original pencil coasters; plastic bottles or toilet paper tubes, corrugated cardboard or toothpaste boxes. Here you will find master classes of original pencil holders in the form of a rocket, a ladybug, a flowering meadow, a man in a folk costume, various animals, cartoon characters, and others, and others ...
Pencils that please the eye and carefully store pencils.
Contained in sections:Showing publications 1-10 of 148 .
All sections | Pencil. DIY pencil holders
Manufacturing pencil holders from newspaper tubes with preschool children (4 - 5 years old. Prepared and conducted educator: Martirosyan K. G. Target: creating conditions for the development of a personality capable of artistic creativity and self-realization of the child's personality through creative ...
 Dear colleagues, dear friends, good day! Today I offer a simple and affordable MK for manufacturing pencil holders. I hope that my MK will be of interest to someone and will be useful. Purpose: at first glance, the toilet paper roll seems quite unremarkable...
Pencil. Do-it-yourself pencil holders - Photo report on the circle work "Pencil stand made of waste material"
Publication “Photo report on the circle work “Pencil holder from junk ...”  We were born on a wonderful planet - Earth. Such planets no longer exist in the solar system, and perhaps in the entire galaxy. Our planet has given us blue skies, clear water, green forests, bright flowers, rich and diverse wildlife. A person is accustomed to this luxurious...
 MAAM Pictures Library
 Purpose: to introduce children to the technique of making a pencil holder from a shampoo can. Tasks: Educational: to form the initial ideas of children about ecology, its role in people's lives, to teach the correct behavior in nature. Developing: develop creative ...
 Master class "Pencil - organizer "from waste material" Group No. 12 "Beads" GBDOU No. 59 St. Petersburg Frunzensky district Developed by: Gorytsina Olga Borisovna Purpose: to introduce the non-traditional technique of decorating from waste material. Tasks: - Teach...
 master class for educators and parents “Pencil or napkin holder” The purpose of the master class: to teach educators (parents) how to make crafts from waste material (old designer). Tasks: 1) to teach how to make crafts from waste material; 2) develop interest...
Pencil. Stands for pencils with their own hands - Pencil from Samodelkinyh
 The pencil box looks very beautiful, which was made by the pupils of the Altn Oddud preparatory group for the school of the MKDOU Kindergarten 7 of the city of Elista, who attend my Samodelkin circle. In order to do this work, I brought a coffee can and with the help of plasticine and ...
 Material description: The relevance of this master class is due to its practical significance: - it is the acquisition of certain experience, abilities in the manufacture and design of souvenirs and handicrafts from foamiran. The master class will be useful for kindergarten teachers, teachers ...
September 1 is not far off, the time when all children will go to school, and students to technical schools and higher educational institutions, it will be time to gain knowledge. Students spend most of their time in educational institutions, but they spend just as much time at home preparing and doing homework.
 In order for the material received in the educational institution to be better consolidated, a comfortable and beautiful workplace at home is necessary. Of course, a desk, a comfortable chair are important, and it is also very important that everything you need is always at hand. A desktop stationery set should cope with this task - a keeper of pens, pencils, erasers, paper clips and other such important little things.
 In this article, the Site news portal has prepared especially for you the best selection of the most original stands for pens and pencils, which you can easily make yourself from improvised materials. You can use a homemade stand for pencils and pens on your own, or you can present it as a gift to your girlfriends or friends, brothers or sisters.
Stand for pencils and pens do it yourself

Necessary materials:

- threads;
- scissors;
- plastic jar;
- wooden popsicle ice cream sticks;
- brush and glue.
Manufacturing:
We cut off the top of the plastic jar so that the bottom remains and a few more centimeters up. Using glue, glue wooden sticks to a plastic jar (see photo).
 Now we twist wooden sticks with multi-colored threads, filling the voids with threads.
 Use threads of different colors, then the pencil case will turn out to be especially bright and unusual.
 You can decorate the finished pencil holder with rhinestones, interesting stripes or buttons.
Do-it-yourself tin can pencil stand
Do-it-yourself stand for pencils and pens from newspaper tubes

Necessary materials:
- newspapers or magazines;
- toilet paper roll;
- glue;
- cardboard;
- double sided tape;
- threads;
- acrylic paints.
Manufacturing:
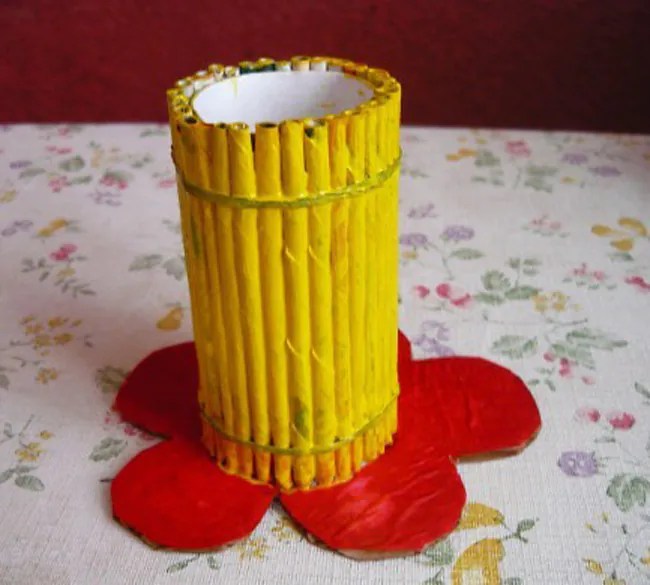
From a newspaper or magazines, wind the tubes, grease the ends of which with glue so that they do not bloom.
 Glue newspaper tubes vertically onto a cardboard roller with glue. For more reliability, tie them with threads.
 Make the bottom for the pencil case curly from a sheet of thick cardboard (it can be a flower, a leaf) and glue the bottom on double-sided tape.
 Now you can decorate the pencil holder and the bottom.
 You can decorate a ready-made stand for pencils and pens with the help of various elements - grass cut out of paper, leaves, flowers, etc.
Stand for pencils and pens from the telephone directory

Necessary materials:
- thick book (telephone directory);
- glue;
- acrylic paints;
- toilet paper rolls;
- cardboard;
- scissors or utility knife.
Manufacturing:
We cut the telephone directory and wrap the pages of cardboard rollers, fix everything with glue. Cut out a figured bottom from a sheet of thick cardboard and glue it to the finished structure. Now you can decorate everything with acrylic paints.
 If you cut the telephone directory into pages of different heights (see photo), then you can end up with an original and unusual pencil case, different in height.

DIY gold pencil holder
Can holder for pencils and pens

Necessary materials:
- tin can;
- the cloth,
- glue;
- decorative braid and ribbons.
Manufacturing:
We measure the tin can and sew a cover for it from the piece of fabric you like. Sheaths the fabric with beautiful ribbons and braid. We put on a cover on the jar.
We fill the edges of the cover inside and glue them on the glue.
Mosaic pencil and pen holder

Necessary materials:
- can;
- a piece of foam;
- primer;
- stationery knife;
- acrylic paints;
- glue
- cement mortar, sealant, or putty.
Manufacturing:
First of all, a layer of primer must be applied to a previously cleaned tin from contamination.
 Using a sharp knife, cut out the squares from the foam sheet that need to be decorated with colored acrylic paints.
 We glue the painted foam pieces with glue to the tin, not forgetting to leave gaps between them.
 Now fill the gaps with a primer using a regular sponge. Wipe all the excess and the pencil box is ready.

Do-it-yourself tumbler stand for pencils
Stand for pencils and pens made of thread

Necessary materials:

- can;
- threads;
- glue;
- buttons, ribbons, ribbons and bows for decoration
Manufacturing:
A tin can must be carefully wrapped with multi-colored threads, periodically smearing them with glue so that they do not unwind afterwards.
Now you can start decorating. Decorate the pencil holder with buttons, beads, decorative ribbon and rhinestones.
Preparing a child for school is not only stressful for the future carpenter himself, but also for his parents, and, first of all, for their wallet. Pens, pencils, rulers, notebooks, copybooks - a considerable list is typed, the result of which is a number with three zeros. But on some little things you can save money, for example, make a cup for pencils with your own hands. This is a functional element that must be on the table of a preschooler and schoolchild. He organizes the child and teaches him to order, to the fact that everything should be in its place. Most of the techniques for creating a cup for pencils are very simple, so you can master them together with your child, or you can completely entrust him with the creative process. A do-it-yourself glass will be valued much higher than store-bought ones.
There are a lot of ways to create cups for pencils. They range from the simplest, which even a toddler can do, to more complex ones that require certain skills and skill levels. This article provides examples of just some of the simple ways.
From a toilet paper roll
This cup is easy to make. This lesson can be entrusted even to a younger preschooler. The process will captivate him very much, and a 100% guarantee of obtaining a good result will indescribably please.
You will need:
- toilet paper sleeve;
- corrugated paper;
- colored cardboard;
- scissors and glue.

- Cut out a rectangle from paper. The height of the rectangle is equal to the width of the sleeve, and its width is equal to the circumference of the sleeve. For this, it is not necessary to carry out complex mathematical calculations. It is enough just to wrap a sleeve with a sheet of corrugated paper and make notches at the cut points.
- Using glue, the sleeve is pasted over with corrugated paper and set aside to dry.
- From cardboard you need to cut flowers of arbitrary shape and quantity.
- At the last stage, cardboard flowers are attached to corrugated paper with glue.
You can stop there and get a very nice glass or go further. You can add additional decor from improvised materials, such as ribbons or paper clips. And by adding a little imagination, it is quite possible to get a cheerful caterpillar from several of these cups.

From a can
Not every household waste needs to be thrown away immediately. Some of them can acquire a second, completely uncharacteristic for them, life. For example, you can make an original pencil cup from a used tin can.

You will need:
- empty tin can;
- a piece of linen or canvas;
- transparent PVA glue;
- decorative tape;
- decor element (flower, accessories, etc.).
- Rinse the tin and remove the paper label if there is one.
- Use a file to sand the sharp edges where the can was opened.
- Take a piece of linen fabric or decorative canvas tape and glue it to the jar with transparent PVA glue.
- Glue decorative tape to the top of the jar over the base fabric.
- Glue a flower in the center of the front of the jar.

This is just an example algorithm. Using various materials, you can create absolutely unique cups.
In the technique of origami
There is a way in which only paper is required to create a cup for pencils. This method is called modular origami. The technique is simple, but requires perseverance and patience.

You will need:
- sheets of paper;
- scissors;
- sheets of cardboard;
- PVA glue;
- simple pencil.

- You need to cut out 176 rectangles from paper.
- Fold them in the way shown in the picture.

- To build the first level, you need 24 modules. They need to be folded in this way: 2 modules are inserted with sharp edges into the third, which will be located, as it were, between them.

- By the same principle, 8 levels are connected upwards.
- Next, we seal the bottom of the product. To do this, you need to turn it upside down and reinforce the first row with another row of modules.
- A circle is cut out of cardboard in diameter equal to the diameter of the cup, and glued from below. This will be the bottom of the glass.
The origami cup is ready.
If desired, and acquiring a certain level of skill, you can create cups from several colors, as well as display color patterns from paper modules.

If you can’t master such a technique, then you can simplify the task. To do this, it is enough to glue the paper modules together. In this case, they will no longer disintegrate, and it will be much easier to work with the product. After making the first few cups, you will gain the firmness of your hand and in the future you will be able to work without glue, create not only cups, but also more complex products.