
So let's make funny little animals and fairy-tale characters together from dry leaves.
There is no need to look for another such material for leaf appliqué: bright, of various shapes and sizes, with interesting tints of colors.
Autumn leaves are not only a cheap and accessible material, they simply fall on your head and spread like a carpet under your feet. Do not be lazy! Choose and create!
Making applications from leaves
For the applique of autumn leaves you will definitely need paper And glue. To achieve the desired result, change the shape of the leaves using scissors. Remember, you can only use dried leaves(usually they are dried between the pages of books, or with an iron, covered with paper on top).

The next step is to come up with a picture. I think there will be no problems with this. From the leaves you can make fairy-tale characters, animals, various landscapes, or just a beautiful ornament.

What types of applications are there?
When making applications from leaves, you can use various techniques, giving the craft uniqueness and originality. I will tell you about several such techniques.


Examples of leaf applications
Hope, examples of photographs of autumn leaf applications, which I have prepared especially for you, will certainly help you create interesting images, picturesque landscapes, and your room will always be decorated with a small a piece of autumn. Making leaf applique is very easy when there are so many beautiful examples available. Usinfantry!


Useful tips
In autumn, nature provides a huge selection of materials from which you can make various crafts, paintings and applications.
In this article you will learn how to make beautiful flowers from leaves, a vase from yellow autumn leaves, and many other crafts, including crafts that you can do with your children.
On our website you will also find:
- Beautiful and simple applications for those who love autumn
- Beautiful DIY crafts made from natural materials
Crafts from autumn leaves: bowl

You will need:
Colorful leaves
PVA glue
Sponge or sponge brush
Scissors.

1. Inflate the balloon.
2. Mix water and PVA glue in a 1:1 ratio.
3. Use a sponge to apply PVA glue to the ball.

4. Carefully begin gluing the leaves to the ball one by one.
* Trim if necessaryscissorsleaves or twigs attached to them.
5. Apply glue over the glued leaves to secure them in place.

6. Continue gluing leaves until the entire bottom half of the balloon is covered.
*You may need to glue more leaves to the bottom of the ball to ensure the bottom of the future vase is strong.

7. Leave to dry for 24 hours, after which you can pop the balloon and you're done!
Table decoration made from maple leaves

You will need:
Multi-colored leaves (if you use artificial ones, the decoration will last a long time)
Strong thread or fishing line
Scissors
Superglue or hot glue
Baking paper
Masking tape
Centimeter.
1. Using a centimeter, measure the distance between the chandelier and the table so that you know how long to cut the thread and baking paper.
2. Cut the paper to the desired length.


3. Cut the thread, the length of which should be 15-20 cm longer than the baking paper.
4. Using masking tape, secure the thread at the top and bottom of the paper, leaving 15-20 cm hanging from one end of the paper. You will use this end of the thread to tie the craft to the chandelier above the table.


5. Starting with the top piece of masking tape, begin laying out the leaves (face down and from largest to smallest), leaving a few centimeters (5-7 cm) between them. Continue adding leaves all the way to the bottom.
6. Once you have everything laid out and are happy with how the piece looks, use glue to glue the leaves to the string.
7. Make several of these strips with leaves and tie them to the chandelier above the table.
Roses from autumn leaves

You will need:
10 leaves of different sizes (for one flower)
Short branches
Scissors
Duct tape or floral tape.

1. Take a small leaf, place it face down and bend the ends. After this, start rolling the leaf on one side to create a bud.


2. Take the second sheet, turn it face down and fold the top end towards the center.
3. Place the first leaf in the center of the second leaf, fold the outer ends of the second leaf and wrap both ends around the first bud.


4. Continue adding leaves, getting larger and larger leaves.
5. Once you've added all the leaves (or not all of them, but you've got the flower to the desired size), hold the bottom of the flower and begin wrapping it with duct tape while securing the flower around the branch. Trim off any excess parts.


6. Make several similar flowers for a bouquet.

Bouquet of roses from leaves (photo instructions)

Bouquet of roses from leaves (video)
DIY Leaf Crafts for Kids: Turkey

You will need:
Cardboard (for 5-6 circles)
Stapler
Scissors
Leaves (about 20 pieces)
Toy (plastic) eyes.

1. Cut out 5-6 circles of different sizes from cardboard. You can use cups, saucers, plates and other small round objects as auxiliary tools.
2. Remove stems from leaves. Leave two leaves with stems, because... these stems will act as turkey legs.
3. Glue each piece of paper to its own cardboard circle.
4. Stack the circles one on top of the other. They can be attached with glue or a stapler. If you use a stapler, it is better to attach each circle separately to the adjacent circle.
5. Glue a large brown leaf to the back of the large circle.
*If necessaryscissorstrimextra parts.
6. Take one loose sheet and cut out a small triangle from it - this will be the turkey's beak. Glue it to the center of the first leaf.
7. All you have to do is glue on the eyes and the turkey is ready!
Children's crafts from leaves (photo)
Here are some interesting examples of how you can make beautiful children’s crafts from simple leaves:
Applications from autumn leaves: animals


Leaf Crafts for Kids: Alphabet
You can make an alphabet from autumn leaves.


Crafts from dry leaves: paintings
Very beautiful paintings can be made from fallen leaves. These paintings can decorate any interior.

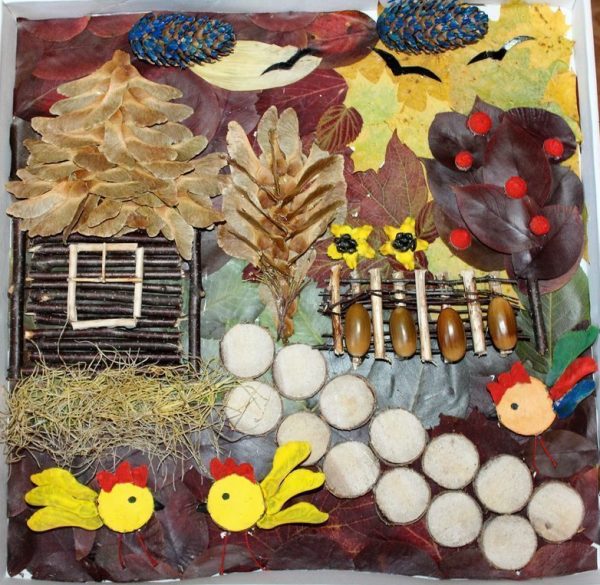
Autumn compositions from leaves
While in the forest, you can make beautiful patterns from leaves on the ground and photograph them as a souvenir.

Crafts from maple leaves: large autumn leaf

You will need:
Plywood or thick cardboard
Simple pencil
Many leaves
PVA glue
Sponge or sponge brush
1. On a large piece of plywood or cardboard, draw a large maple leaf with a pencil.

2. Find fallen leaves in a park or forest and dry them on baking paper.
3. Lay out the leaves in a pattern on the plywood, take a brush and PVA glue, apply glue to all the leaves and leave to dry.

After the glue dries, all the leaves will harden. You can trim off excess parts if necessary.

4. Glue the leaf blank to plywood or cardboard. For better adhesion, use superglue.
5. Use a straight branch as the trunk of your large leaf. It can also be glued with superglue.

Ready!
DIY crafts from autumn leaves: mask

You will need:
Leaves of different sizes
Cardboard (can be from under a box of cereal, for example)
Scissors
Hot glue or PVA glue.
1. Draw a simple mask shape on cardboard and cut it out.
2. Check where on the mask you need to make holes for the eyes.

3. Make holes for the eyes and insert an elastic band into the sides of the mask so that the mask can be put on.
4. Using PVA glue or hot glue, begin gluing the leaves to the cardboard mask, starting from the outside and working towards the center.

Bouquet of flowers from leaves

You will need:
Autumn leaves of different colors (30-35 pieces)
Floral wire
Green adhesive tape (scotch tape) or floral tape
Scissors.

1. Place your leaves on a flat surface in order, from small to large. Clean them from dust and dry them.
2. Use scissors to cut off the leaf stems.

3. Take the wire and cut it into small pieces, about 10 cm long. Each piece will be used for a separate sheet.

4. Take floral tape or regular adhesive tape (scotch tape) and cut or tear off several 5 cm pieces.

5. Take the second largest sheet and wire make a hole in it 0.5 cm from the edge. After this, bend the wire and twist it. This must be done carefully so as not to tear the sheet.
Back view:

6. Use duct tape to wrap the wire. You need to attach the tape to the edge of the leaf and begin to carefully wrap the wire.


7. To attach the wire to the smallest sheet, you need to twist it and only then insert the lower part of the wire into it.

Make a stem out of wire to form the core of the flower.

Wrap the wire with duct tape.

The core and petals are ready and can be connected.
8. Wrap the second leaf around the core and add a second leaf, a third, etc.


Autumn foliage is a wonderful material for creativity. Children are especially interested in making something out of it, and if your child is not very assiduous, then be sure to try making something out of foliage with him. He will definitely enthusiastically create an exciting toy, an animal from what he just ran around on. In our article we will present several master classes on making leaf applications for kindergartens and schools.
Children in preschool and elementary school must make appliqués, because this type of fine art develops motor skills, imagination and creative thinking in children. You and your children try to make these types of crafts from natural autumn materials at home:
- Owl. To make such a craft, you just need to select leaves of different colors and appropriate shapes, as well as a small branch of a vine, because the owl you make will sit on it. Prepare dry glue and plasticine from the office. You will use glue to connect all the elements of the craft, and make eyes from plasticine.

- Autumn tree. Prepare any decorative cardboard to make the picture bright, take blue paper. From another office supply you will also need brown plasticine, a simple pencil to make a blank for wood, and dry glue. From natural materials, prepare as many dry leaves and rowan berries as possible.

- Butterfly. Just choose different leaves according to shape and color. Be sure to find thin brown leaves to make the body of the butterfly. As a last resort, yellow foliage can be painted with watercolors of the desired color.

When working with a child, it is very easy to come up with an application. You can invite him to make his favorite cartoon character or make a postcard for the person he loves very much and wants to show his feelings for him.
Applique carpet of leaves, details with photos

A carpet of leaves is very easy and simple to make. Any preschool child can cope with this application in 2 counts:
- First, ask your child to arrange the leaves on a sheet of paper so that there is practically no gap between them.
- Then let him smear each leaf with dry glue and glue it to the place where he intended.
- If some gaps still remain, tell your child that they can be filled in with a felt-tip pen.
You can use not only leaves in this application; flowers and fruits of autumn trees are also suitable.
You can make a carpet of leaves, but do not completely cover the paper sheet. Come up with some kind of pattern, draw it on paper so that the child can clearly see the contours. Let him glue the leaves that he likes to the places of the pattern. Of course, guide your child during the creative process so that the picture ultimately looks symmetrical.

Hedgehog from leaves applique, step by step

- To begin, draw a hedgehog without needles. You can use the template we have attached below.
- Paint with paints or cover this blank with colored paper. Clearly draw the nose, mouth and eyes of the hedgehog.
- Lubricate the hedgehog's body with PVA glue:

- Glue the leaves in a chaotic manner to the coated base. The main thing is that there is a resemblance to thorns:

Hedgehog template for applique

Leaf fish applique in detail with photo

- On a blue or dark blue colored cardboard (we choose this color if we want to show that the fish is swimming in the aquarium), glue 1 yellow piece of paper, which will represent the body of the fish:
- We make a fish tail from identical red leaves.
- We tear off a small piece from the same red leaf to make a mouth for the fish:

- From the red leaf from which you will tear off part to create the mouth, tear off more pieces of fins. You can simply fold the rest and tear it in half.
- Make a fish eye out of colored paper. You need to make one circle white, and the second (it should be smaller in size compared to white) black.
- Under the finished fish, glue any dry grass or twigs that will act as seaweed:

Fish applique template

Peacock leaf applique, step by step with photo

- Take 5 identical yellow leaves and place them on cardboard of any color to form a semicircle. Immediately glue them with dry glue.
- Take the same number of red elongated leaves and glue them on top of the yellow ones in the same pattern - in a semicircle.
- Cut out the peacock's body from colored paper. For contrast, use bright blue paper.
- Draw eyes and glue a nose from yellow construction paper:

Peacock template for applique

Applique autumn bouquet of leaves, step by step

- On decorative cardboard, first glue a base of dark brown leaves that will represent a vase.
- Glue multi-colored leaves on top of it in a chaotic manner (the brighter these leaves are, the more beautiful the bouquet you will get).
You can combine leaves so that you get, for example, daisies. Also add green leaves to this applique to make the bouquet look lively and bright.
Applique vase with leaves

- On white cardboard or a piece of whatman paper, roughly estimate where your vase will be located.
- From pink decorative cardstock with white polka dots (you can choose any other color and print), cut out a vase using the template below.
- Glue the dried leaves on top of the vase. The arrangement of the leaves can be any.
Use PVA glue or dry glue to make this type of applique.
Vase template for appliques


Applique portrait of autumn from leaves, step by step

- First, prepare everything you need to get started. You will need: a sheet of white paper with an image of a head, a herbarium, PVA glue, stationery scissors with pencils (you will need a simple pencil and multi-colored ones):

- Print out a face template (if you know how to draw, create it yourself):

- Coat the head with glue and then glue the leaves. They should be directed in the direction in which you want your hair to fall:

- Draw your face with pencils and glue on a nose from a strip of paper folded into a triangle:

Beautiful applications from leaves:
kindergarten


1 class


2nd grade


3rd grade


4th grade


Children's creativity made from natural materials is an opportunity for children to touch something beautiful; it is useful for mental development. Create applications with your child at home just like that on any topic. You can be sure that time spent with your child in this way will benefit both you and him.
Video: “Appliques from leaves”
Autumn, fallen leaves crunch underfoot... What a pity for this yellow-red fading beauty, crumbling and trampled into the mud. Here is a birch leaf - gently yellow, jagged, here is an alder - ribbed, and here is a mountain ash - a family of long leaves on a thin stalk. Let's take them home and make beautiful autumn crafts and appliques. We will also need a piece of colored cardboard for the background and glue to glue the leaves.
How to make an applique of autumn leaves
Autumn leaves dried outside are not even and quite fragile, so first we’ll dry the leaves ourselves. We find freshly fallen, bright and beautiful, undamaged leaves, and put them between the sheets of some thick book. We put the book under a press (under something heavy). In a week or even earlier, the smooth autumn leaves for applique are ready; they can be easily glued to paper or cardboard with PVA glue.
Sequencing
A true artist sees living images in nature, so we can dream up our imaginations. Let’s lay out all our collected and dried wealth in front of us and see what it’s like. Take suitable leaves and place them on cardboard until you get a picture. There is no need to glue it yet, first just lay it out until you are happy with everything.
When the picture is perfect, you can glue it. We take one leaf at a time, remembering where it was, smear it on the back side, and glue it in place. If the application is multi-layered, first glue the lower leaves, then the top layer. The craft is ready! You can admire it!
But what if appliqué ideas just don’t come to mind, and the leaves only look like leaves, and not at all like bunnies and chanterelles? Then take advantage of our ideas.
Leaf craft ideas
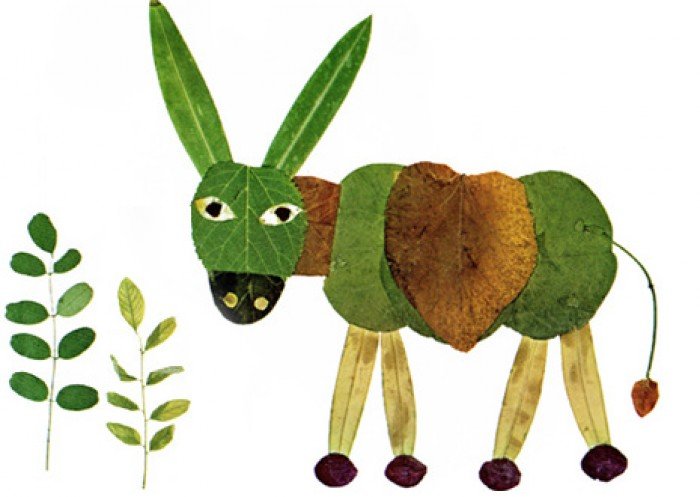
Applications with animals
Owl made of leaves:


Red cat


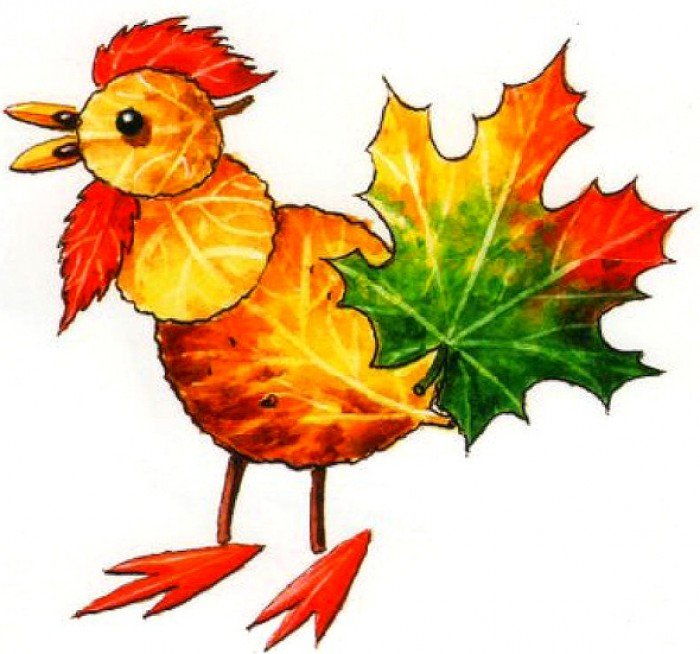
Bird with chicks:


And even an eagle:

Landscapes of leaves
For a landscape, the background can be painted with watercolors.


Still lifes

Portraits


The finished application (if it is not voluminous) can be placed under a press so that after drying it remains flat. Store in a dry place, perhaps in a frame under glass.
Olga Kulikova
Master class on making applique from autumn leaves"Peacock"
Has arrived autumn- the most wonderful time of the year and, unfortunately, the most fleeting. Exactly in the fall you start to notice how fast it goes time: just yesterday the trees were green, and through them the sun shone through the foliage, today leaves turned yellow and crumbled to the ground. And there is no better time to collect and use all the gifts autumn: leaves, seeds.
I offer you an option autumn leaves appliques"Peacock".
For this we need:
Cardboard for the background, the more contrast it will be with ours leaves, the more effective the composition will be;
Cardboard for making a bird body, or plasticine;
PVA glue or glue stick;
Scissors;
Dry leaves - rowan, maple, birch;
Sunflower seeds;
Inspiration.

1. Lay out the gold ones birch leaves in a semicircle:

2. From burgundy leaves rowan berries form the feathers of an open tail peacock:

As an option, we make a tail from maple sheet:

3. Cut out the body from cardboard peacock and glue it on composition:

Or we sculpt the body of a bird from plasticine:


We do the same actions with plasticine option: make a nose from a seed using plasticine of a different color - eyes:

5. Our PEACOCK is ready!

I'll be glad if mine master-the class will be useful to you in classes with children. Such a bright bird, easy to make, will definitely complement the collection of crafts of your children and pupils
Thank you all for your attention and inspiration!
Publications on the topic:
Dear friends, I want to offer you an idea for decorating a group for the autumn season. I called my craft “Autumn Lanterns”. For execution.
Master class on making applique “Scarlet Sails” with children in kindergarten Usually, when working with children, there are always colored covers left over.
Master class on making calla lily flowers applique. Almost all children love to make crafts, I suggest making these wonderful ones with them.
1. Materials and tools that will be required: - colored paper, - colored cardboard, - glue stick, - felt-tip pens, - stapler, - white napkins.
The bright holiday of Easter is approaching. And the guys and I decided to make an applique for this holiday, which we gave to our parents. For this.
In our second junior group, as part of the Russian Matryoshka project, nesting dolls were made from various materials. These are matryoshka dolls in technology.